Gravity Forms Stripe Integration is a free extension for Gravity Forms which allows you to accept credit card payments on your WordPress site. This Stripe Add-on enables Stripe payment gateway in Gravity Forms so you can capture one-time credit card payments or set up recurring payment subscriptions.
Requirements
- Gravity Forms v1.8.8+
- WordPress v3.8+
- SSL Certificate
- A self-hosted WordPress site running on a WordPress Optimized Environment.
In order to securely capture credit card information, you will need to have an SSL certificate installed on your site. You can contact your web host if you need assistance in purchasing and configuring an SSL certificate.
Installation
- Download the zip version of the add-on
- Go to Plugins->Add New and switch to the Upload tab
- Select the zip file on your computer
- Upload and install it
Gravity Forms Setup
After installing the Stripe Add-On, the first thing you will need to do is configure your form to work with it. This is done by using the Pricing Fields to configure the purchase selections and the Credit Card field to allow users to enter their credit card information on the form.
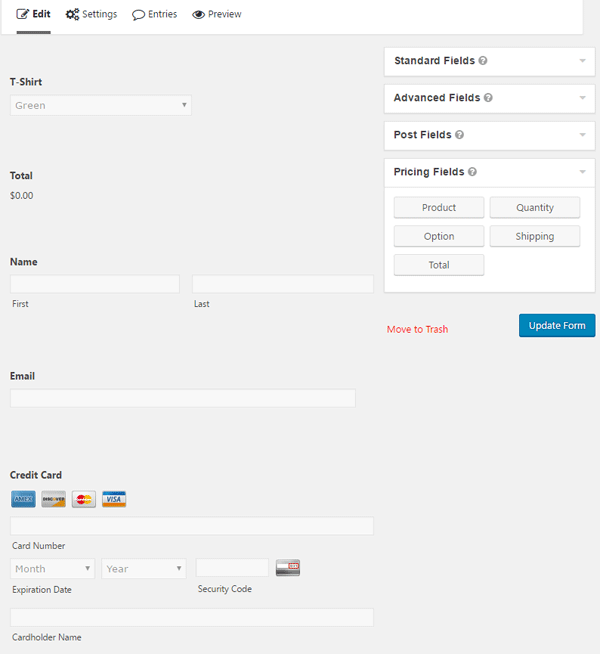
1. Go to New Form under the Forms navigation menu or choose an existing form from Edit Forms in your WordPress admin dashboard.
2. Add Fields for capturing standard payment information such as Name, Email, Address, etc. These are available in the Advanced Fields toolbox.
3. Add Pricing Fields to your form such as Product, Total and configure them to suit your needs. In my case, I set up a T-Shirt product with drop down choices.
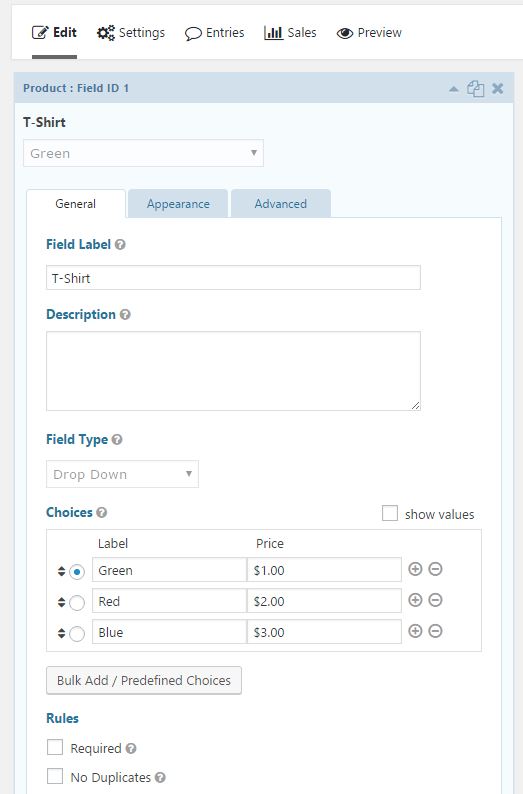
4. Add a Credit Card Field from the Pricing Fields toolbox to your form.
5. Save your form.
Stripe Configuration
Now that you have your form created the way you want it, it’s time to set up the Stripe addon and connect it to your Stripe account. This is done via Stripe’s API and the setup requires you enter your Stripe API account credentials on the Stripe Add-On Settings page.
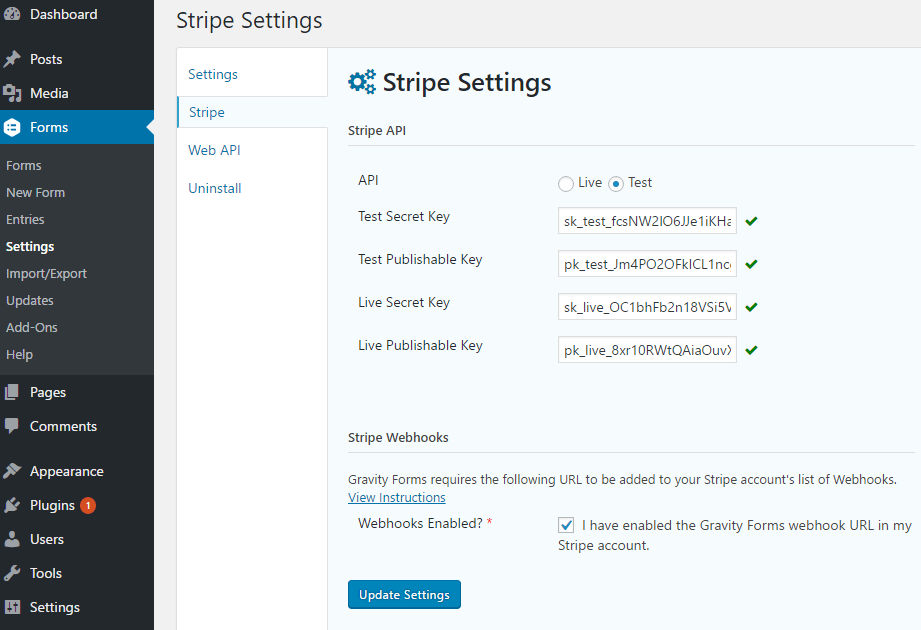
1. Go to Settings under the Forms navigation in your WordPress admin dashboard.
2. Select Stripe from the Settings sub-navigation.
3. Select the API to use for Stripe integration, Live or Test. Live is for real transactions, Test is for testing the integration and submitting test forms.
4. Enter the Test Secret Key for your Stripe account.
5. Enter the Test Publishable Key for your Stripe account.
6. Enter the Live Secret Key for your Stripe account.
7. Enter the Live Publishable Key for your Stripe account.
8. Confirm that you have enabled Webhooks in Stripe by following the instructions provided in the Settings.
How to find your Stripe API Keys
Login to your Stripe account at http://www.stripe.com and go to your Account Settings. Select API Keys from within the Stripe Account Settings and the Live and Test API Keys for your account will be displayed.
Stripe Feeds Configuration
Now that you have configured the Stripe Add-On to work with your Stripe account, and you have a form configured and ready to interact with Stripe, it’s time to bring it all together by configuring the form to integrate with Stripe. This integration is done by creating a feed.
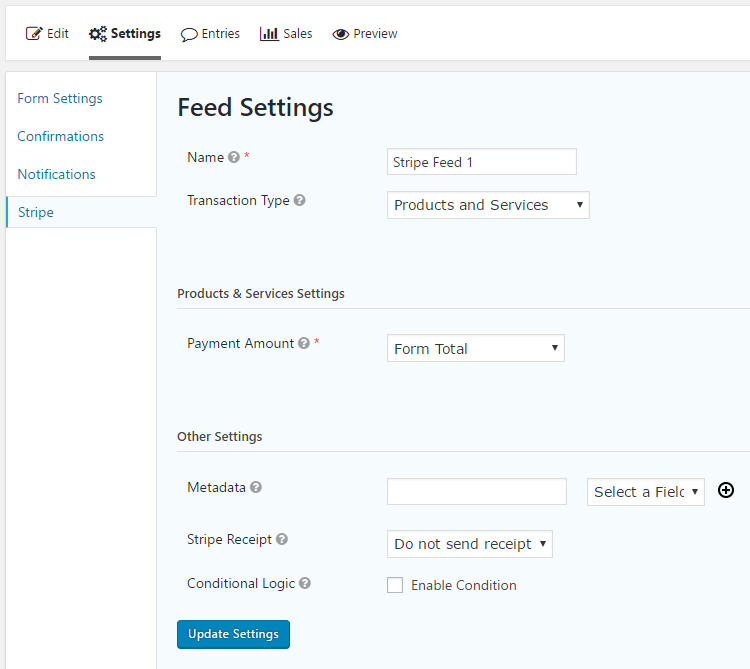
1. Go to the Stripe settings page located under the Forms Settings for the Form you’d like to integrate with Stripe.
2. Select Add New to add a new Stripe Feed.
3. Enter a Name for this Stripe Feed. This is to distinguish between multiple Stripe Feeds in situations where multiple Stripe Feeds may be necessary.
4. Select the Stripe Transaction Type. You can choose from Products and Services which is a single one-time payment, or Subscription for recurring payment subscriptions.
If you have chosen Products and Services as your Transaction type you will then select what determines the payment amount. You can choose a specific Product Field to determine the payment amount or the overall Form Total.
If you have chosen a Subscription as your Transaction Type you will be given options for the Recurring Amount, Billing Cycle, Setup Fee and if a Trial is enabled or not. You will also be given the option to map Email and Description under Customer Information.
If you would like the Stripe integration to occur conditionally, enable Conditional Logic. This functions just like Conditional Logic on fields by only triggering the execution of this Stripe Feed if the condition is met. Conditional Logic also allows you to configure multiple Stripe Feeds for a single form and trigger the correct one based on Conditional Logic.
5. Save your Stripe Feed.
Gravity Forms Stripe Checkout Demo
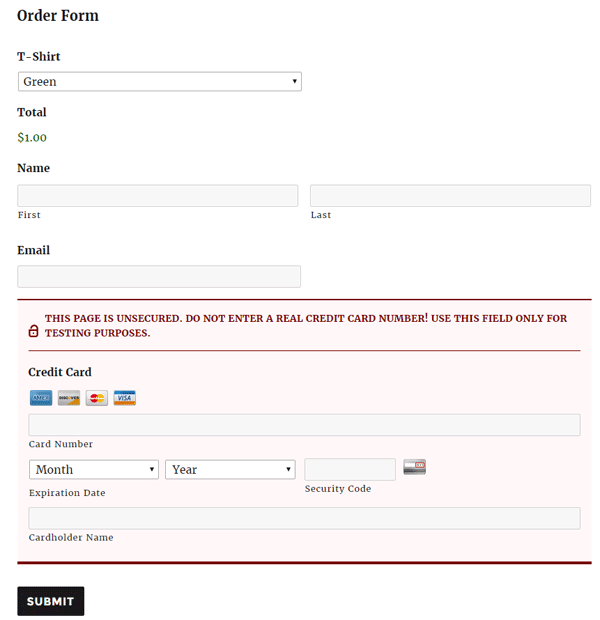
If you Preview or view your form on a page that is not secure, it will be obvious, both to you and your users if you do not properly secure the page. If the page is unsecured the Credit Card Field will be highlighted with a red warning. This warning will not be displayed if the page displaying the form is loaded via https with a valid SSL certificate.
Stripe Subscription Cancellation
When setting up a Stripe Subscription, please keep in mind that the only way to currently cancel a subscription is via the WordPress Dashboard or the Stripe admin. You cancel an existing subscription by viewing the entry associated with the subscription and choosing the cancel option for the Stripe subscription.