Checkout for PayPal WordPress plugin connects PayPal to your WordPress website and makes e-commerce available for you. With this PayPal plugin, you can create smart payment buttons with a simple shortcode to accept PayPal payments from your customers.
Checkout for PayPal plugin uses the PayPal Checkout API to create a simplified and secure checkout experience for your customers. With one simple shortcode, you can add a PayPal smart payment button to your website that lets you accept PayPal, Venmo, Pay Later, credit and debit card payments as well as payments via alternative payment methods from any mobile device, tablet, or PC.
Alternative Payment Methods
Alternative payment methods allow customers across the globe to pay with their bank accounts, wallets, and other local payment methods.
- Bancontact
- BLIK
- EPS
- iDEAL
- Multibanco
- MyBank
- Przelewy24
- Trustly
Checkout for PayPal Plugin Installation
- Login to your WordPress admin dashboard
- Go to Plugins->Add New Plugin
- Enter Checkout for PayPal naa986 in the search box
- Once you find the plugin hit the install button
The plugin can also be downloaded from here: https://wordpress.org/plugins/checkout-for-paypal/. For a manual installation go to Plugins > Add New Plugin > Upload Plugin and select the zip file that you downloaded.
How to Configure Checkout for PayPal
Checkout for PayPal uses PayPal REST API to add smart payment buttons to your website. To Generate REST API credentials for the sandbox and live environments:
- Log in to the Developer Dashboard with your PayPal account credentials.
- On My Apps & Credentials, use the toggle to switch between live and sandbox testing apps (If you are creating a Sandbox app, you will also need to select a test business account that will act as the API caller).
- Navigate to the REST API apps section and click Create App.
- Type a name for your app and click Create App. The app details page opens and displays your credentials.
- Copy and save the client ID and secret for your app.
- Review your app details and save your app.
Log in to your WordPress admin dashboard and navigate to Checkout for PayPal > Settings.
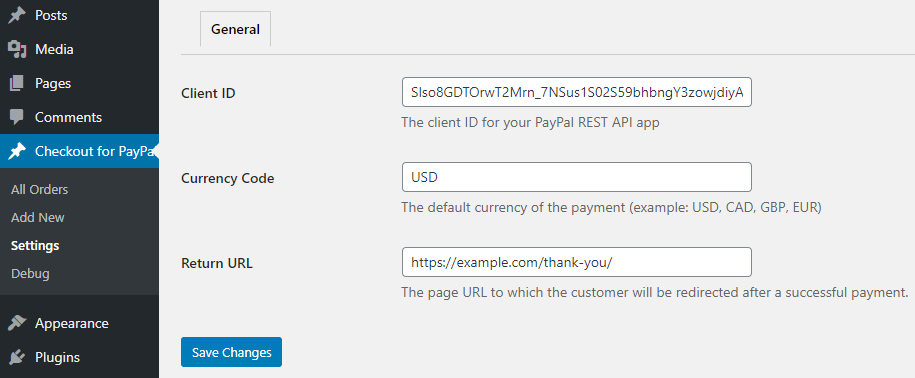
- Enter the Client ID for your REST API app.
- Enter the Secret Key for your REST API app.
- Enter the default Currency Code.
- Enter a return page URL to which the customer will be redirected after a payment.
- Click Save Changes.
General Settings
There are some optional settings in the General tab that you can configure to customize the Checkout experience.
Cancel URL
The default URL to which a customer will be redirected after a payment is cancelled.
Locale
The locale used to localize PayPal Checkout components. For example, fr_FR. The default is empty where PayPal detects the correct locale for the buyer based on their geolocation and browser preferences.
If you wish to customize this parameter you can find the full list here.
Load Scripts Globally
By default, checkout scripts are loaded only when a shortcode is present on a page. Enabling this option will load the scripts on every page.
Enabled Funding Sources
Funding sources that should be displayed as buttons at checkout (comma-separated format). Example:
- venmo
- venmo,credit
- venmo,credit,paylater
It is not necessary to manually specify a funding source as the eligibility is determined by PayPal automatically. However, this field can be used to ensure a funding source is always rendered, if eligible. You can find the full list of funding sources here.
Disabled Funding Sources
Funding sources that should not be displayed as buttons at checkout (comma-separated format). Example:
- card
- card,credit
- card,credit,paylater
You can find the full list of funding sources here.
Buyer Country
The country to determine which funding sources are eligible for a given buyer. For example, US. This test-mode-only feature lets you test checkout as a buyer from a particular country.
Email Settings
In the email settings area, you can choose to configure some email related settings.
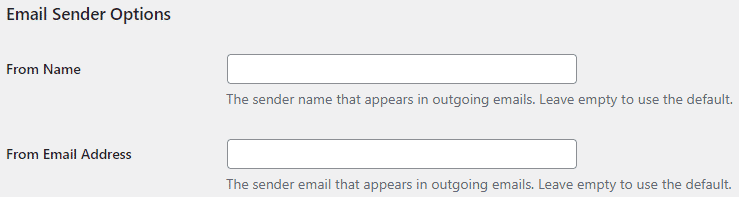
Email Sender Options
In this section, you can specify a From Name and From Email Address that will be used by the Checkout for PayPal plugin when sending an email. You can leave them empty to use the default.
Purchase Receipt Email
Checkout for PayPal plugin allows you to send a purchase receipt email to the customer after completion of a successful purchase. By default, this feature is disabled. In order to use this feature, you need to enable it in the settings.

You can customize the following options in the purchase receipt email,
- Purchase Receipt Email Subject: The subject line for the purchase receipt email.
- Purchase Receipt Email Type: The content type of the purchase receipt email (Plain Text/HTML).
- Purchase Receipt Email Body: The main content of the purchase receipt email. You can use various tags in the email body to dynamically change its content when it is sent.
Sale Notification Email
Checkout for PayPal plugin can send a sale notification email to your chosen recipient after completion of a successful purchase. By default, this feature is disabled. In order to use this feature, you need to enable it in the settings.
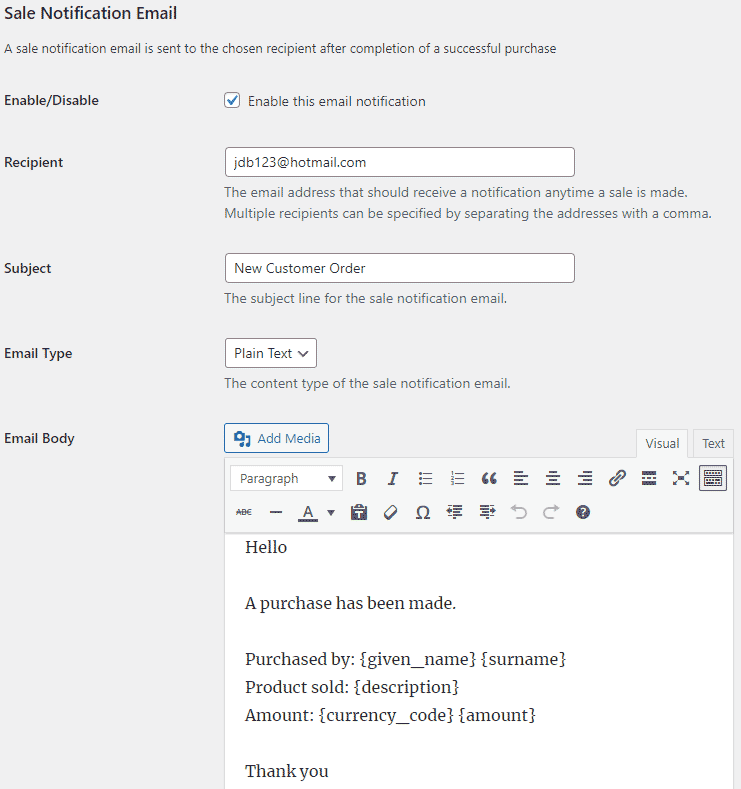
You can customize the following options in the sale notification email,
- Sale Notification Email Recipient: The email address that should receive a notification anytime a sale is made.
- Sale Notification Email Subject: The subject line for the sale notification email.
- Sale Notification Email Type: The content type of the sale notification email (Plain Text/HTML).
- Sale Notification Email Body: The main content of the sale notification email. You can use various tags in the email body to dynamically change its content when it is sent.
Email Tags
The following email tags can be used in the email body to dynamically change its content when an email is sent,
{given_name} – The customer’s given name.
{surname} – The customer’s surname.
{txn_id} – The unique transaction ID for this purchase.
{description} – The purchase description.
{currency_code} – The currency code used to make the payment.
{amount} – The total order amount.
{item_total} – The total item amount.
{payer_email} – The customer’s email address.
{shipping_name} – The customer’s shipping name.
{shipping_address} – The customer’s shipping address.
{shipping} – The shipping fee.
{phone_number} – The customer’s phone number (available only when the “Contact Telephone Number” option is enabled in your PayPal merchant account under “Account Settings > Website payments > Website preferences”). PayPal only supports national numbers at the moment.
How to Create a Smart PayPal Button
In order to create a smart payment button, you just need to insert a shortcode with a description and a price in the button parameter. The shortcode needs to be inserted into a shortcode block of the default WordPress post/page editor.
[checkout_for_paypal item_description="My item description" amount="3.99"]
If you want to use the shortcode in a custom field, the field name must be checkout-for-paypal-custom-field and the field type must be WordPress editor.
Note: The content of the button (e.g. name, amount) is rendered in HTML and can be altered before checkout.
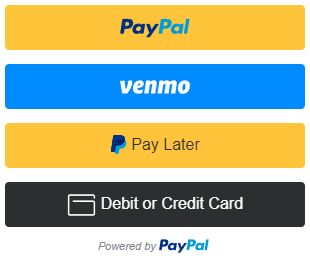
PayPal Smart Payment Button Demo
PayPal Button Customizations
Item Description
The “item_description” parameter can be added to the shortcode to pass a description of your item to PayPal. For example:
[checkout_for_paypal item_description="My item description" amount="3.99"]
Return URL
The “return_url” parameter can be added to the shortcode to redirect the customer to a specific page on your site after the payment. For example:
[checkout_for_paypal item_description="My item description" amount="3.99" return_url="https://example.com/thank-you/"]
Cancel URL
The “cancel_url” parameter can be added to the shortcode to redirect the customer to a specific page on your site when the payment is cancelled. For example:
[checkout_for_paypal item_description="My item description" amount="3.99" cancel_url="https://example.com/payment-cancelled/"]
Shipping Preference
The “shipping_preference” parameter can be added to specify the location from which the shipping address is derived. For example:
[checkout_for_paypal item_description="My item description" amount="3.99" shipping_preference="NO_SHIPPING"]
The default is GET_FROM_FILE.
Button Layout
The “layout” parameter can be added to the shortcode to change the layout of the PayPal button to horizontal. The default is vertical. For example:
[checkout_for_paypal item_description="My item description" amount="3.99" layout="horizontal"]

The horizontal layout shows a maximum of two buttons.
Button Color
The “color” parameter can be added to the shortcode to change the color of the PayPal button to blue, silver, white or black. The default is gold. For example:
[checkout_for_paypal item_description="My item description" amount="3.99" color="blue"]
Button Shape
The “shape” parameter can be added to the shortcode to change the shape of the PayPal button to pill. The default is rect. For example:
[checkout_for_paypal item_description="My item description" amount="3.99" shape="pill"]
Button Size
The “width” parameter can be added to the shortcode to change the width of the PayPal button. The default is 300px. For example:
[checkout_for_paypal item_description="My item description" amount="3.99" width="500"]
Shipping
If you wish to charge a shipping fee for the item you can use the “shipping” parameter in the shortcode. For example:
[checkout_for_paypal item_description="My item description" amount="3.99" shipping="1.50"]
Manage PayPal Orders
When you receive a new order through PayPal checkout it will appear in the Orders menu. You can then ship the goods to finalize it.

Elementor Page Builder Integration
Checkout for PayPal Add-ons
Checkout for PayPal plugin comes with an add-on that you can use to enhance its functionality on your website.
Variable Price
Variable Price add-on lets buyers set the amount they will pay. It can also be used for accepting donation payments.
Dynamic Buttons
Dynamic Buttons add-on lets you render a different button based on the parameters set in the URL.
Contact Form 7 Integration
Contact Form 7 Integration add-on lets you accept PayPal payments with the Contact Form 7 plugin.
Order Export
Order Export add-on lets you export order data to a CSV file.
Get All Checkout for PayPal Add-ons

* Variable Price
* Dynamic Buttons
* Contact Form 7 Integration
* Order Export
License: Unlimited Websites
Note:
* Do not purchase before setting up the core plugin first. The add-on is not at fault if the core plugin does not work on your website.
* Do not purchase if you are not sure about a feature, contact us instead.
* Do not purchase to ask for more features or make the product work in a certain way.
Frequently Asked Questions
What is this plugin used for?
This plugin allows you to accept PayPal payments on your WordPress site using the PayPal Checkout API. It integrates seamlessly with your checkout flow and offers a secure and streamlined payment experience for your customers.
Do I need a PayPal Business account?
Yes, you need a PayPal Business account to use the Checkout API and accept payments through this plugin.
Is this plugin compatible with Elementor Website Builder?
Yes.
Does it support one-time and recurring payments?
The plugin supports one-time payments. Recurring payments via subscriptions may be supported in a future release or through additional integration.
Is the plugin secure?
Yes. The plugin uses PayPal’s Checkout API and never stores card or payment details on your server. All payment processing is handled securely by PayPal.
Hi there!
My PayPal checkout buttons are showing but not working when pressed or clicked on. How can I fix it?
Thanks!
@RJ, Please provide a link to the page in question.
Hi there,
I am testing the plugin with only a sandbox client id/secret key. The live client id/secret key fields are empty and the “test mode” check box is checked. In this configuration the PayPal button does not display.
Looking at the code I believe this is because the load_scripts function (in main.php) does not consider whether the plugin is used in test mode when setting the client-id argument.
Not sure if this is by design or not, I thought I would mention it.
Cheers,
Osvaldo
@Osvaldo, The plugin only checks for the live client id. If you don’t plan to use it in live mode you can fill in those fields with your sandbox credentials instead.
Hello noorsplugin,
I need help with the plugin is that possible i already install everything but ideal not working can help?
@Faysal, Can you please describe the issue?
Why do you have sandbox credential fields in the settings if these are never used? I have the same issue. Nothing displays…
@Jeff, They are used when the “Test mode” option is enabled.
I use the following code:
$return_page = home_url() . ‘/landing/?param1=value1¶m2=value2’;
echo do_shortcode( “[checkout_for_paypal” .
” item_description=’$item'” .
” amount=$amount” .
” return_url=’$return_page'” .
” cancel_url=’$cancel_page'” .
” no_shipping=1 layout=vertical]”
);
And after payment the control is returned to:
/landing/?param1=value1#038;param2=value2
i.e. the ‘&’ character is changed to its html entity number and obviously this does not work as intended.
Any idea what’s going on?
Thanks,
Osvaldo
@Osvaldo, We have released an update for it. Let us know if it fixes the issue.
if there are two or more parameters then only the first stays as an & the second ‘&’ character is changed to its html entity number.
eg
/landing/?param1=value1¶m2=value2#038param3=param3@Paul, Can you please describe your setup?
I have more than two parameters if you change line 901 from
$return_output .= “let return_url = temp_return_url.replace(‘&’, ‘&’);”;
to
$return_output .= “let return_url = temp_return_url.replace(/&/g, ‘&’);”;
it will replace all instead of just the first & in the URL
@Paul, Thanks for reporting this. We have updated the plugin.
It works! Thanks for the prompt fix,
Osvaldo
Is it possible to have buttons for apple pay and google pay via Paypal,
@Paul, It’s not possible at the moment.
Hi there,
I have purchased the variable price extension a while back. Now it stopped working.
Checkout for Paypal: Version 1.0.47
Checkout for PayPal Variable Price: Version 1.0.4
@Stefan, Please use the contact form on our site to get in touch.